
Download the jLog User’s Guide (PDF) |
jLog (available at jlog.org) is a modern Ham radio logging program that can run on all major platforms, e.g. macOS, Linux, Windows, etc. It offers a nice, clean interface and allows efficient entry of QSOs. And, it is available for free so you can afford to try it! jLog has proven to be very stable, but you never know… Adding new functionality can introduce errors. Save copies of your log files frequently to a safe backup location, just in case…
jLog is written in Java and developed on a Mac, but can in principle, run on almost any platform. Installers have been tested with macOS (15 and 10.11), Linux (Ubuntu 22.04 LTS and Fedora 38), Windows (Windows 11 Pro and 10 Pro). Versions of jLog prior to V6.7 required Java to be installed prior to installing jLog, but jLog now brings a subset of the Java JRE (Java Runtime Environment) as part of jLog.
The User Interface is designed to be efficient, nice and easy to learn. Your comments are invited to mail@jlog.org.
A major rewrite of this guide is on-going…
1. Install/Uninstall jLog
Download jLog from https://jlog.org and run the installer according to instructions on the jLog Download page specific to your platform. Installation should be self explanatory for most users and default values should be used unless you know what you are doing.
The jLog application uses less than 60 Mbytes of disk space plus space for the database(s). Unless you document a lot per entry, the database file is typically 200 bytes in average per entry, i.e. 4 Mbytes for 20 000 entries. Memory usage is typically 17 - 22 Mbytes (depending on configured jLog max. capacity) plus 2 kbytes per entry, i.e. approximately 64 Mbytes for 20 000 entries or 21 Mbytes for 2000 entries.
2. Getting started with jLog
When starting jLog for the first time, three warnings will be issued:
-
"No Profile found"
-
"File not found ("funckeys..txt")"
-
Reading backup file failed
These warnings can be safely ignored and should not reappear. After loading is completed, the jLog Main Window should appear with no entries shown.
Note that Tool Tips (providing guidance) will appear when the mouse pointer is positioned over most buttons and fields.
2.1. The Main Window
An example of the Main Window is shown below using the macOS Look and Feel.

The Status Window is continuously updated when the different rows of the Main Window are selected. The Previous Field is also updated and is showing either previous contacts with the same station or the same country (selectable).
Navigate up/down be means of the Up/Down-keys. Open a selected entry by pushing the Space Bar.
The Status Window is automatically updated with the Country, CQ Zone, ITU Zone, Continent and rotor information (direction and distance). The current DXCC status (Worked/Confirmed) for CW, SSB and FT8 on the 9 HF bands is automatically displayed.
A Callsign search field is available to initiate searches throughout the whole log for a specific station or country. Wildcard syntaxes like 'SM5*' can be used to find all previous contacts with the SM5 area.
2.2. The Entry window
The Entry window allows entry of new QSOs and display or modification of existing QSOs. The macOS Look and Feel is shown below.

For new QSOs, time, frequency and mode is automatically updated from the radio if "Auto" is active. Push the "Start" button to set the current computer time into the start time field. Push the "End" button to set the current computer time into the end time field. Push "Ref" to manually update the detailed frequency field on the 2nd line in the rightmost position.
Note that the fields that are updated automatically are not changeable unlessthe "Auto" checkbox is unchecked. Power and Location are also considered to not need frequent updating (can be set using the Preset command).
The State/Province field is only valid for US and Canadian callsigns. It lists all States or Provinces respectively.
Navigate from field to field using the TAB-key (and SHIFT-TAB to go backwards). The Enter key is used to select OK or APPLY (if this was used to end the previous entry). The idea is to use a minimum of keystrokes and mouse operations.
New entries are backed up until properly saved to the log file. If jLog or the computer suddenly crashes, new entries are read from the backup file the next time jLog is started. The User is asked whether these entries should be added or not.
Use the Prev/Next buttons to quickly navigate from entry to entry without closing the Entry Form.
2.3. Setting up the initial User Profile
Select 'Profile' from the 'Tools' menu and, as a minimum, fill in the following information:
| Misc tab | |
|---|---|
Backup directory (folder) |
Select a (sub)directory to be used for storing copies whenever 'Backup' is activated. Remember to clean up from time to time |
Date format |
Choose the preferred date format |
Position at newest entry… |
Select to automatically scroll to the end of the Log |
|
|
User tab |
|
Config. name |
Configuration name, i.e. the name of this specific
combination of Callsign, City, Grid, Rig, IOTA, etc. |
Abb. Config. name |
A two or three letter abbreviated Id to be used in
the Main Log Window |
Callsign |
Normal callsign syntax, e.g. 'XX1XX' |
Full name |
Your full oficial name (e.g. for use when submitting Contest Logs in the Cabrillo format). Syntax: Given Name + Surname. |
Gridsquare |
The Maidenhead gridsquare should be filled in (preferably
also the more precise Lat/Lon also) |
* |
|
Power Low/High values |
Set your defaults for the 'Low' and 'High' quick select Power buttons |
Favorite frequencies |
Select three quick select Frequencies |
|
|
Additional attributes are assumed self explanatory or described below (See Tools->Profile).
2.4. Resizing and removing columns
Note that the Date and Time columns must always be present as the first two columns.
First, use the View->Columns command to remove unnecessary columns or, just right-click on a header in the Main Window and in the popup window, click on the menu entry that you want to remove.
Import the current set, remove (and sort) as desired before saving it as View '1'. Save the current view by issuing the View->Save View->1 command.
Then, in order to adapt jLog to your screen, columns should be resized. First, use the View->'Auto resize view' command. Then, if necessary, move the cursor to the Main Window column header and place the cursor between two rows (the symbol <-> should appear). Hold down the left mouse button and move the mouse to resize the column. Repeat for any other columns that need adjustment. Save the current view by issuing the View->Save View->1 command.
The Previous table will be resized to the same values when jLog is restarted or views are changed.
2.5. Adding information
Note that the 'Auto' mode should be turned off if a radio is not used to set Frequency and Mode.
2.5.1. Entering QSOs manually
jLog requires no additional preparation before use. To enter a QSO simply select the 'New' command from the 'Entry' menu. Fill in the applicable data and click the 'OK' button. The entry should now appear in the Main Window. Repeat the sequence for the next entry. To enter multiple QSO without closing the Entry window, enter 'Apply' instead of 'OK' to finish each entry.
2.5.2. Import existing data using ADIF
If you have log data from a previous Log program, data can be imported’Open' using the popular ADIF format if the old program supports this. This is the recommended way to import data! jLog has been verified to operate correctly with several other programs.
The default ADIF file extension is '.adi'.
2.5.3. Import existing data in a non-ADIF format
If, and only if, existing data is not available in ADIF format, you should export data in a text format suitable for a Spreadsheet program like Excel. Restructure data using one of these programs and export the modified data in a "comma separated" format, i.e. using Semicolons as a separator as the preferred separator. The sequence of each line of data must be according to jLog’s built-in V6 format (all on one line and no extra spaces or semicolons!):
Date;Time;Station;Frq;Mode;Pwr;Conf;Sent;Rcvd;End;Name;QTH;Remarks;S;R; DXCC;STX;SRX;Mult;Pts;ITU;CQ;ContID;Pfx;Cont;Freq;RXpwr;State;Prov;County; QSL_Via;Age;Grid;QslRdt;QslSdt;Sect;Iota;Prop;Qslmsg;Satmod;Satnm;Tenten; Addr;Notes;Submode;DOK;OBL;JCC;JCG;BandRX;QRP;SWL;Cmpl;QSO#;Lat;Lon;eqslS; eqslR;eqslS_Dt;eqslR_Dt;lotwS;lotwR;lotwS_Dt;lotwR_Dt;Rig;Az;El;Eq;FI;MB; MSSH;Bursts;Pings;Op;QRZupl;ClLupl;Sig;SigInf;Key;Config;Email;S_via;R_via; Q;ud1;ud2;Web;SrxSt;StxSt;FreqRx;Rnd;A_Ix;A_Path;Check;Class;CredSub; CredGr;Dist;IotaIId;K_Ix;Prec;SFI;ud3;ud4;ud5;ud6;ud7;ud8;V_St;ContOp;SKCC; FISTS;USACA;VUCC;SOTAref;sp10;sp9;sp8;sp7;sp6;sp5;sp4;sp3;sp2;sp1
Use '.jdb' as file extension to easier find the file from jLog. Use the 'Open' command from the 'File' menu to read the file. Note that this is a risky operation because jLog has not been built to allow manual generation of its internal format. It is assumed to be correct! Enter data manually in jLog, save to a file and inspect the file to verify the syntax.
2.5.4. Saving and opening a file
The default filename used by jLog is 'Logbook.jdb'. You may use this as the name for the most frequently used file to be placed in the jLog Home folder. If this file is not found, jLog will remember the last file written to. You can open the last four files written to using File->Recent. Edit the file 'save/recent.txt' to edit the the recent-list, if necessary.
3. Menus
The Mac OS X Application menu ("jLog") contains the "About jLog"(see Help->About) and "Preferences" (corresponding to the "Profile", see Tools->Profile).
3.1. File
The commands Open, Save, Save As, Close, Recent and Exit are assumed to be self-explanatory. Other commands are:
3.1.1. Sort
If you import log info from different files with overlapping date/time, the sort command can be used to align the data. Sorting the log other than by Date/Time in Ascending order may be used to get an overview or to save a copy for special purposes.
3.1.2. Backup
This will make a copy of the current file in a predefined directory using a unique name and never overwriting a previous copy. The directory can be selected using the Tools->Profile command. If not set, the jLog installation directory is used. Note that you must manually delete files from time to time to recover disk space!!!
3.1.3. Replace
Replace all occurrences of a given value throughout the log file for either Station, Mode, Frequency, RST Sent or RST Received fields.
3.1.4. Export and Import
Export all entries or only a subset of entries, i.e. selected or queued entries. Queued entries have the 'Q' column checked.
ADIF .adi
The Export and Import commands use the Amateur Data Interchange Format (ADIF) V3 to allow interchanging data with other log programs.
JLog supports all ADIF 3.0.9 tags except: MY_ANTENNA_INTL, SILENT_KEY
ADIF .adx
The Export and Import commands use the Amateur Data Interchange Format (ADIF) V3 to allow interchanging data with other log programs using an XML-format.
JLog supports all ADIF 3.0.9 tags except: MY_ANTENNA_INTL, SILENT_KEY
Cabrillo
Contest logs can be exported in the Cabrillo V3 format in to a file, typically named '<callsign>.cbr', e.g. 'LA3HM.cbr'.
Some information can be lost when exporting to a '.cbr'-file so preserve the original '.jdb'-file also.
HTML
Export log in HTML format to allow opening in any browser for display and optionally printing. Use File->HTML Setup to select header, columns etc.
JDB
Use Import to merge a jLog database file into another database file. The resulting Log will be automatically sorted as part of the Import.
3.1.5. HTML Setup
Setup configures the HTML output to a Browser. Add a title and select the columns to be included.
3.1.6. Print Setup
jLog will initially make use of the printer defaults, but allows you to
save specific setting for orientation and margins.
Note that whether margins are specified in 'cm' or 'inch' is depending
on the Profile (Misc-tab) setting for Distance ('km' or 'miles').
3.1.7. Print
You may print the log using this command. It will display a Preview of
all pages and "Print" button that should be used to initiate the actual
printing.
3.1.8. Properties
The Properties command provides additional data such as the number of entries on the log, a DXCC summary of total Confirmed and Worked and the number of prefixes worked.
The values for the 8 User defined columns related to this particular log file are shown. You can load or save these values from/to the sets defined in the Profile (UserDef tab).
3.1.9. Look and Feel
jLog is delivered with the most suitable Look and Feel for each platform. If the native causes problems, the Java Look and Feel is used in stead.
jLog V6.9 or newer provides a beautiful 'Light Flat' theme and a few similar Dark themes.
You may want to experiment by changing Look and Feel. The last used value is used when restarting jLog. This value is saved in the 'save/LAF.1' file. This file can be deleted to start with the jLog default values.
3.2. View
3.2.1. Find
Perform a simple search through all fields for the specified text string. The search starts at the currently selected row. The search stops at the next row containing the specified text in any field. Type e.g. a blank to open the entry or 'e' to edit it.
Use Find Next (F3) to continue to search for the next occurence.
3.2.2. Find Next (F3)
Repeat the previous Find from the currently selected row.
3.2.3. Filter
This allows you to filter the Main Log Window based on e.g. a date
range, CW-only and may be most important Configuration (i.e. to see only
QSOs from your weekend QTH).
3.2.4. Search
The advanced Search is also available as a Button on the Main Window. Use Search to specify a complex search by combining dates, modes, etc. Note that when entering a date, 'yyyy' is interpreted as '01.01.yyyy'.
3.2.5. Bands
Allows you to select the bands that are actually used for various menus
(to make the drop-down menus shorter and more user friendly).
3.2.6. Frequencies
Allows you to select the frequencies that are actually used for various
menus (to make the drop-down menus shorter and more user friendly).
3.2.7. Columns
Use this command to tailor the view of jLog to your needs. It lets you choose the Active columns, i.e. that will appear in the Main Window, rearrange their sequence but moving columns up/down in the Active view. Hide columns by removing them from the Active view and un-hide columns by copying them from the Available view to the Active view. Note that this can also be done in the Main Window by moving column headers and using the new header right-click menu to hide/un-hide columns.
Three different sets (Views) can be stored. Set '1' is always selected when jLog is started. When loading or saving a permanent setting, use the Radio buttons to select the set to be updated. You can also load the set currently used. Read more in the [Tailoring the View] section.
In order to change the flexible columns in the Available view, push the Setup Flexible Columns button. It will open a window showing all possible column values. Choose up to 25 columns to appear in the Avaiable view.
3.2.8. Modes
The Mode menu can be tailored; i.e. to only contain the modes you actually use. Select or deselect individual modes. Avoid using Submodes (an ADIF 1+ proposed extension that was never approved).
3.2.9. Contest IDs
The Contest ID menu can be tailored; i.e. to only contain the IDs you actually use. Select or deselect individual IDs.
3.2.10. View 1, 2, 3, and Save View→1, 2, 3
The Main Window view is configurable with respect to each column’s size, the sequence columns appear in and which columns that are shown. Rearrange columns as it suits you and save the current view as one of three predefined views using the Save View→1, 2, 3 command.
Use one view for normal operation, one for contest operation, etc. Note that the three views operate on the same set of chosen flexible columns.
3.2.11. View All
View All makes all Flexible colums visible and resizes column widths. Re-arrange if necessary, before saving as View 1, 2 or 3.
3.2.12. Auto resize view
Resize all columns of the Main Window, taking into account the width of the column header as well as the width of every row in the column. Provided that the width of all columns are less than the width available, all columns will be visible. When space is limited, a horizontal scrollbar all columns will become active and thereby avoiding columns to be shrinked. Note that the maximum length of any column can be adjusted in the Profile (Visible tab).
3.2.13. Switch Theme
Switch between the default Light or Dark themes setup in the Profile (Visual tab).
This is equivalent to use of the "Theme" button in the Toolbar.
3.3. Entry
3.3.1. Open
Open the currently selected entry using the Entry form. If 'Edit' mode
is checked, the "Auto" checkbox is automatically unchecked to allow
editing. Modified information is shown in red colour. Consider carefully
before saving it by clicking the OK button. If 'Edit' mode is unchecked,
the entry is opened and changes will be ignored.
3.3.2. New
This opens the Entry form to allow entry of new QSOs.
Time, frequency and mode is automatically updated from the radio in "Auto" is active. Push the 'Start' button to set the current computer time into the start time field. Push the 'End' button to set the current computer time into the end time field. Push "Ref" to manually update the detailed frequency field on the 2nd line in the rightmost position.
Note that these fields that are updated automatically are not changeable unless the "Auto" checkbox is unchecked. Power and Location are also considered to not need frequent updating (can be set using the Preset command).
The State/Province field is only valid for US and Canadian callsigns. It lists all States or Provinces respectively.
County is only valid for US callsigns and displays all Counties within the Selected State (above).
Navigate from field to field using the TAB-key (and SHIFT-TAB to go backwards). The Enter key is used to select OK or APPLY (if this was used to end the previous entry). The idea is to use a minimum of keystrokes and mouse operations.
New entries are backed up until properly saved to the log file. If jLog or the computer suddenly crashes, new entries are read from the backup file the next time jLog is started. The User is asked whether these entries should be added or not.
Use the Prev/Next buttons to quickly navigate from entry to entry without closing the Form.
3.3.3. Insert
Allows you to insert a new entry in front of a selected row anywhere in
the log.
3.3.4. Delete
The last entry entered can be deleted. Note that older entries cannot be deleted!
Hint: To remove an old entry in the log, set the date to a date newer
than "today’s" date. Sort the log and delete the last entry.
3.3.5. Add Remark
Use this command to add the same remark to a number of selected entries.
3.3.6. Set configuration
Mark selected entries as belonging to a certain configuration (defined
in the Profile). Configurations can be used to differentiate between
callsigns, addresses, rigs, etc.
3.3.7. Set Contest ID
Set the Contest ID value for selected entries.
3.3.8. Map
The currently selected QSO will be opened in a Map viewer provided that there are any geo information (Grid or Lat/Lon) available. Use the'Show <grid>' button to draw the grid onto the map. The button appears when a grid is available.
If your maps contains many white areas, the local map cache may have to be cleared. Use the 'Clear' button. Please note that this will increase your network traffic significantly and also put more load on OpenStreetMap servers.
3.3.9. HamQTH lookup
Online lookup from HamQTH.com of the station of the currently selected row. The information is displayed in a separate window. User/password for HamQTH must be registered in the Profile.
3.3.10. QRZ lookup
Online lookup from QRZ.com of the station of the currently selected row. The information is displayed in a separate window. Use ctrl-F5 to open the QRZ window from the entry window and ctrl-F6 to transfer relevant values. User/password for QRZ must be registered in the Profile.
Note that unless you are a registered, paying customer, only the Name and Country fields will be displayed. To see the remaining fields, a paid QRZ XML license is needed as a minimum.
3.3.11. View eQSL
Display the QSL-card from eQSL provided that the "eR" column is
checked.
3.3.12. eQSL Submission
Send selected entries to eQSL provided that User/Password for eQSL is
registered in the jLog Profile, manual submission is enabled and if
required, eQSL Nickname properly setup in The active Profile Config and
eQSL tabs. If successful, the 'eS' flag is checked. A dialog box is
shown in case errors or warnings are issued by eQSL.
3.3.13. LoTW Submission
Send selected entries to Logbook of the World (LoTW) provided that User and Password for LoTW is registered in the Profile and manual submission is enabled. If successful, the 'loS' flag is checked. A dialog box is shown in case errors or warnings are issued by LoTW.
Note that TQSL (from ARRL) must be installed and TQSL Path and
Location(s) must have been properly setup in the active Profile Config
and LoTW tabs.
3.3.14. QRZ Log Submission
QRZ provides a logging service that allows real-time logging of new entries from jLog. This can make your log more available and also serve as a remote backup. Note that this requires a QRZ membership at XML Data or higher (also used for full QRZ lookup). Provided that a valid QRZ Logbook 'API key' has been entered into the Profile, this command sends the selected entries to QRZ Logbook. You can provide a singe API Key in the Favourites tab or one key per configuration in the Config tab to allow QRZ logbooks reflecting e.g. different calls or QTHs.
3.3.15. HRDLOG Submission
HRDLOG provides a logging service that allows real-time logging of new entries from jLog. This can make your log more available. Provided that a valid HRDLOG 'Upload Code' has been entered into the Profile (Favourites tab), this command sends the selected entries to HRDLOG.
3.3.16. Club Log Submission
QRZ provides a logging service that allows real-time logging of new entries from jLog. This can make your log more available. Provided that a valid Club Log 'Application Password' has been entered into the Profile (Favourites tab), this command sends the selected (single) entry to Club Log.
Note that Club Log does not allow multiple entries to be sebt using this real-time service.
3.3.17. QSL Services Info
Gather information from eQSL, LoTW, QRZ and HamQTH regarding the use of eQSL and LoTW by the callsign being looked up.
When used from the Entry menu or from mouse right-click menu, the callsign of the currently selected row is automatically searched.
3.3.18. Goto
Position at the first entry of a specific date in the log.
3.3.19. Preset
Set the default values for Frequency, Mode, Power and Location to be used in the Entry form (see above). Note that the frequency and mode values are not used when a radio is connected to supply this information. The Power and Location values can be set directly or by using the values available using the buttons. The values are used as default values when creating new entries.
Use the 'Set Default' button to save the current values as the new start-up values.
3.3.20. Auto
Set 'Auto' (i.e. "Radio present") mode as the default. Band and Mode are automatically filled in for new entries.
3.3.21. Edit
Check the Edit mode to allow changing existing entries. If unchecked, entries are opened in read-only mode.
3.3.22. Edit S/R
Values shown in the Main Window cannot be changed directly. An exception
is the QSL Sent/Received Check Boxes. Check the Edit S/R to allow
modifying these values directly from the Main Window.
3.4. Report
3.4.1. DXCC
Display the detailed DXCC status. The content is assumed to be self-explanatory.
Show
Show all log entries matching a selected country, e.g. to select the entry to be used as proof of contact. The result is displayed in the lower part of the Main Log Window.
OK
Close the DXCC display. Nothing is saved or modified.
Save As
Save data as shown (e.g. with rearranged columns and sorted content) to a file, e.g. to be used by an external Spreadsheet program or a Word processor for further handling.
Sort
Sort the content to get a better view or before saving it to a file by clicking the appropriate column header.
3.4.2. WAC/WAS/WAZ/WPX/USCA/IOTA/VUCC
Display status for the Worked All Continents (WAC), Worked All States (WAS), Worked All Zones (WAZ), Worked all Prefixes (WPX), US Counties Award (USCA), Islands On The Air (IOTA) and VHF/UHF Century Club (VUCC) awards. The Save As commands are described above (under DXCC). Sort by clicking the appropriate column header.
Note that the WAS Report now handles the Primary Administrative Subdivision of many countries (e.g. CA, CH, BE, DE, DK, FR, NL, PT).
Mixed/CW/SSB/DIG
Select 'Mixed', 'CW', 'SSB' or 'Dig' to change the view for the different frequencies and show the corresponding totals in the status row (bottom).
Show
Show all log entries matching a selected state, e.g. to select the entry to be used as proof of contact. The result is displayed in the lower part of the Main Log Window.
3.5. Contest
"The Contest functionality has been considered experimental and has remained unchanged for many years. The primary support is for the SAC, ARRL-DX-SSB, ARRL-DX-CW, CQ-WPX-SSB and CQ-WPX-CW contests.
Only auto-updated numeric sequence number exchanges are therefore supported. This is expected to change in the next version.
Use a separate log file when operating during the contest. This file can later be merged with your ordinary log.
3.5.1. Recalc
Recalculate Multipliers and Points for the contest selected under Recalc modes. Note that a Recalc mode (e.g. SAC, ARRL, CQWW, etc.) must be selected and Contest Mode turned on before Re-calc is activated. Multipliers and Points are updated in the log and the resulting numbers are displayed in a popup.
Note that this still is considered experimental functionality and only covers a few contests.
3.5.2. On
Turn On/Off Contest Mode (e.g. auto incrementing the Send sequence number).
3.5.3. Recalc modes
Set the contest Recalc modes for the few contests with support for automatic calculations, or select Manual mode for all other contests.
3.5.4. Setup
Select the Contest ID from the larger list maintained under 'View->Contest ID'. The Cabrillo length and Exchange type will be automatically filled in for the most popular contests. If not, read the contest rules and determine the proper values to be selected.
The Exchange Type indicates whether one or two extra exchanges are used in this contest (in addition to RS(T) or dB). It also indicates whether or not exchange 1 is numeric and should be auto incremented after each QSO. The available values are:
-
Exchange 1
-
Exchange 1 Auto number
-
Exchange 1 Auto number + Exchange 2
-
Exchange 1 + Exchange 2
Fill inn any fixed values for Exchange 1 and Exchange 2.
If Auto number is to be used, set the current value of the Number series
manually. This value is automatically incremented.
3.5.5. Header
Setup the Cabrillo V3 header to be used when exporting a contest log. Saves the current values (to a file named 'cab-hdr.cbr'). These values will be used when exporting a log using 'File->Export->Cabrillo'.
3.6. Spot
Internet DX Spots (DX Clusters) are handled via Telnet or via the DX Concentrator (DXC) application. DXC must be installed on the same computer as jLog or on a computer accessible via a TCP/IP network (e.g. LAN or Internet). See the jLog Profile for setup.
3.6.1. Log
Open the Spot Log window to overview incoming DX Spot reports.
3.6.2. Visit
Set the frequency of the radio to the frequency of the currently selected entry in the Spot Log. Use Entry->Preset to set default mode for 'visit spot'
3.6.3. Connect
Open a connection to the host for receiving spots from the host chosen in the 'Spot' tab in the jLog Profile.
3.6.4. Disconnect
Close an open connection..
3.7. Tools
3.7.1. Clock
Show/Hide the Clock by checking this command.
The Clock always displays UTC format.
3.7.2. Keyer
Show/Hide the Keyer using this command.
3.7.3. mini-Keyer
Show the mini-Keyer.
3.7.4. eQSL Sync (Inbox)
On-line synchronization with eQSL.cc to update the status for received cards; i.e. sets the eQSL Received flag for entries corresponding to the current log.
3.7.5. eQSL Import (Outbox)
Import saved eQSL.cc "Logbook/OutBox" file to update the status for
sent cards; i.e. sets the eQSL Sent flag for entries corresponding
to the current log.
3.7.6. LoTW Sync…
On-line synchronization with LoTW to update the status for
received cards; i.e. sets the LoTW Received flag for entries
corresponding to the current log. You must choose the date interval
for the update. Please avoid unnecessary large intervals as this
increases the load for the LoTW QSL Service.
3.7.7. US State/County QRZ Web-lookup
US State/County can be automatically looked up from QRZ.com via an Internet connection. The result is automatically entered for all selected entries provided that the callsign is found in the QRZ.com database.
Note: Select an area by first clicking on the start row (i.e. select it). Then, scroll to the last row to be selected, press SHIFT and click on the last row. The whole area should now appear as selected. You can select/deselect a specific row by holding down CTRL and clicking the row. Repeat for multiple rows.
3.7.8. Zones Lookup (New V 6.8)
Use QRZ and/or HamQTH to lookup missing or ambiguous zones in the selected rows. Note that this puts a heavy load on the lookup services, so use it when necessary.
3.7.9. Verify
Checks the currently open Log. The result is displayed in a new Log
Window. One or more entries can be selected and opened, edited or made
hidden. The latter relieves you of having to see warnings that have
already been checked out.
3.7.10. QSO Number
The QSO Number value indicates the next QSO Number to be used for new entries.
Re-number the current log starting with the QSO Number specified (should normally be set to 1 if the whole log is to be renumbered).
3.7.11. Duplicates
Find duplicate entries and optionally remove them. Please note that only the fields Date, Time on, Station, Frequency, Mode, Send, Receive, Time off, Name and QTH are checked.
3.7.12. Prefixes
When a callsign is logged by jLog, the prefix part of the callsign is extracted and stored separately. Rebuild selected prefixes, either just empty or overwrite old values. This can be especially useful with QSOs logged or imported with legacy versions of jLog that limited the numeric part of prefixes to 2 digits.
3.7.13. Distances
Recalculate distances for selected QSOs, either blank only or overwrite old values.
3.7.14. Show on Map
Show selected log entries on a Map. Use Main Window sorting prior to running this command to e.g. display certain modes or frequencies.
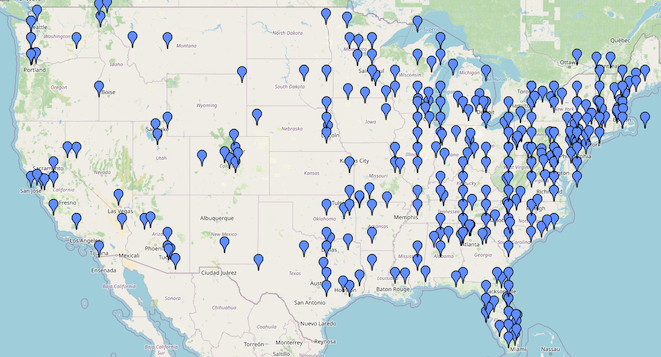
To get more information about a specific contact, click at the very bottom of a marker on the map and extra info will appear in the info field below the map. Click the 'Open' button to show the corresponding entry in the log.
If your maps contains many white areas, the local map cache may have to be cleared. Use the 'Clear' button. Please note that this will increase your network traffic significantly and also put more load on OpenStreetMap servers.
3.7.15. WSJT-X Tracker (New V 6.8)
The WSJT-X Tracker (or just Tracker for short) is a built-in tool that links jLog and WSJT-X to provide extended capabilities. It assists the user in keeping track of confirmed Countries, Prefixes, US States and US Counties by both color coding callsigns in WSJT-X entries and by it own list of potential stations of interest. More information is available here.
3.7.16. GeoCalc
Open the Geo Calculator dialog to allow various conversions of Latitude and Longitude values to/from Gridsquare. Note that various forms are accepted, e.g.
-
DD.DDDDD
-
DD MM.MMMM
-
DD MM SS.SSS
All three are acceptable. You can choose between the first and the last
when calculating Lat/Lon from Gridsquare.
3.7.17. QRZ lookup
Lookup information regarding a selected entry from QRZ.com. Note that unless you are a registered, paying customer, only the Name and Country fields will be displayed. An XML license is needed as a minimum and user/password for QRZ must be registered in the Profile.
When used from the Tools menu, it starts with an empty callsign.
3.7.18. QRZ Web lookup
Open the default browser to display the selected user’s page at QRZ.com.
3.7.19. HamQTH lookup
Lookup information regarding a selected entry from QRZ.com. User/password for HamQTH must be registered in the Profile.
When used from the Tools menu, it starts with an empty callsign.
3.7.20. QSL Services Info
Gather information from eQSL, LoTW, QRZ and HamQTH regarding the use of eQSL and LoTW by the callsign being looked up.
When used from the Tools menu, it starts with an empty callsign.
3.7.21. Radios
Radio Setup has been separated from the Profile to allow Profile changes without disturbing active radios. Many changes to radio setting will require a jLog restart.

Setup three Radios and other optional interfaces. The built-in Keyer shares the COM port with a Radio. You must check the "Radio present" box even if you use a keyer only (see Radio Parameters in the Radio Interface below). The three radios have separate sub-tabs with equal content.
A radio can be connected in either of these ways:
-
Serial COM port, typically USB based
-
TCP connection to the radio
-
TCP connection via Flrig to the radio
-
TCP connection via Hamlib rigctl to the radio
The TCP connections allow for the radio, Flrig or rigctl to be running on the same computer, in the same local network, or even remotly (via Internet).
Flrig is a popular and highly recommended way when the connection has to be shared by e.g. jLog, WSJT-X, N1MM and others since the applications can use the radio in parallel due to the XMLRPC protocol offered by Flrig and supported by these applications.
After having selected the preferred way to interface the radio,
jLog will enable/disable other parameters accordingly.
Serial setup
For serial connections, Port is used to select a built-in or USB-based serial port. Note that you may have to re-start jLog after having checked "Radio present" in order to see any entries in the "Port" drop-down menu. You will need to re-start jLog after plugging in a USB-device, too. Then set the proper Baudrate.
For TCP/IP connections the address and port of the radio must be entered. The radio or more precisely the application for the radio is typically running on the same computer as jLog. The address can then be entered as localhost or 127.0.0.1. The port is determined by the radio. The Reconnect TCP/IP button will attempt to reconnect the current radio and close the Radios window. If this is unsuccessful, jLog will have to be restarted.
Set the manufacturer and model. You may have to experiment with different Auto refresh values and enable/disable the auto refresh depending on the radio model. A to high refresh rate may garble data or block the radio. Icom and most Kenwood radios should not need to use auto-refresh provided that they are set up to report automatic frequency and mode changes. ICOM refers to this as "Transceive" mode. Select Auto upd. in this case. If Transceive is disabled in the radio, you will have to use Auto refresh.+
For serial connections, the *Modem status* is for information only and displays the actual status of the control signals. Set controls allows you the activate DTR (should normally be activated, specifically if it is the source of power for other modem signals). Flow control mode should normally be set to RTS ON unless a Keyer is connected (in which case "KEYER" should be selected). Use the other alternatives only if your radio manual specifies that RTS/CTS signaling or XON/XOFF is to be used.
Flrig setup
Flrig is a transceiver control program for Amateur Radio use. It supports most popular rigs today.
Hamlib rigctl setup
Hamlib is an open-source software library designed for controlling amateur radio transceivers and rotators. It was made for Linux, but can be downloaded for all platforms, if not already installed. It is useful due to it’s support of almost every rig.
After installing, and always prior to starting jLog, the rigctld server must be started in a Terminal window as follows:
rigctld -m <radio id> -r <USB device> -s <baudrate> -t <port> &
e.g. rigctld -m 3029 -r /dev/cu.usbserial-A403KZQ1 -s 9600 -t 4532 &
Type rigctl -l in the Terminal to display a list of all available radio models and their corresponding id.
Built-in CAT Server setup
Each radio may have a corresponding CAT Server set up to share the radio connection with WSJT-X. The port selected here will have to be entered into the Radio setup of WSJT-X and to use the jLog CAT Server, WSJT-X must specify FlexRadio 6xxx as the Rig and Network Server 127.0.0.1:<port> where <port> is the port setup in jLog, e.g. 127.0.0.1:5005.
In order to allow WSJT-X to turn on/off TX (transmitter) via CAT, you have the option of specifying the sequence used by your radio for TX On and TX off. When using the CAT Server, these values will have to be "TX1;" and "RX;" respectively. This may be integrated into the radio definition files in a future version of jLog.
WSJT-X Auto logging setup
Logging address/port is where WSJT-X send logging info after a contact has been completed, typically set to localhost:2237. This must correspond to the setup in WSJT-X.
wsjtx.log path is optional as must be set to the directory fond by the WSJT-X 'File->Open log directory' command. It is used for WSJT-X file import only as is not necessary if the logging address/port has been set up.
Radio 1 and 2 sync setup
Sync Delay is experimental and allows radio 1 to be synchronised to radio 2. If radio 1 is a traditional transceiver, radio 2 can be an SDR receiver used to navigate. You will also need a T/R-switch (e.g. MFJ-1208B-SDR) to control antenna switch-over. Experiment with 200 - 500 ms sync delays. This combo will make the old transceiver become a modern SDR transceiver when it comes to user experience.
The Reconnect+OK button will attempt to reconnect all radios and close the Radios window. jLog will have to be restarted if this is unsuccessful.
3.7.22. Profile (for macOS: jLog->Preferences)
See also the description in the Getting Started Chapter above. The Profile is unchanged when installing an updated version.
Misc tab
Home folder should be set to the folder where you keep your log files, etc.
Backup folder should be set to a dedicated folder, preferably on a different drive. Whenever the Backup button is pushed, a copy of the current (.jdb) log file is saved (with a '.tmp' extension). Remember to clean up from time to time.
Backup frequency can be used to make automatic copies of the log at regular intervals. make sure that you have the free space needed for may copies of the log. The interval is calculated from the previous automatic backup or last push of the Backup button.
Date format allows changing between the three formats: 'yyyy-mm-dd', 'dd.mm.yyyy' and 'mm/dd/yyyy'. The current log is updated when closing the profile.
Distance unit is used to display the distance part of the Rotor
information (and will currently also affect Print Preview’s choice of
unit for margins ('cm' or 'inch').
Position at newest entry after Open will set the initial position to
the last entry in stead of the first entry.
Show filename in title makes the filename that is always shown in the Status bar more visible (in case you have multiple copies of jLog running simultaneously).
Open WSJT-X Tracker window at start-up is for those who are mainly using
FT8. You can always use Cmd-T (Mac) or Alt-T (Windows/Linux) to open
it.
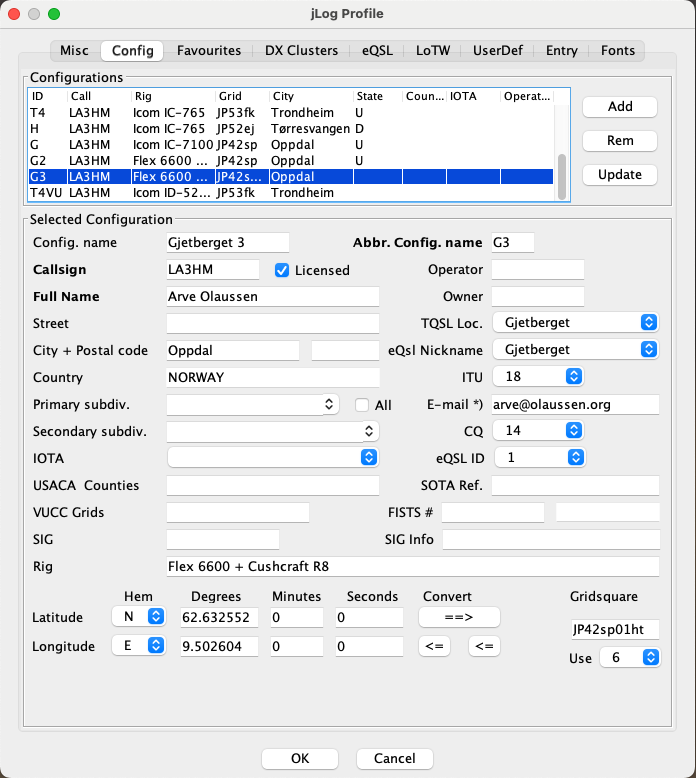
Config tab
You should define at least one configuration and as a minimum fill in Callsign and Full Name fields. Verify that the Country is correct and also the CQ and ITU Zones in case they are not automatically set to an unambiguous value.
Configurations are typically used to reflect alternative QTHs, but can be used to reflect e.g. guest Operators or Rigs (in case multiple rigs can be used for a given frequency or mode). Any of TQSL location, eQSL Nickname or QRZLog API key will provide linking to a different QTH.
You may enter a precise 10 character long Gridsquare to generate lat/lon but can still limit the length for ADIF export to e.g. 6 (settable from 4 to 10).
Favorites tab
Setup values for Power Low/High buttons and the three Favorite frequency buttons to be available i the Entry window.
Specify the Default signal strength to be used for new entries when no
value is filled in.
Source for QSL Status tracking and DXCC Report determines the source
and offers the choice between the Paper-based QSL columns, the eQSL
columns or the LoTW columns. Note that you will have to re-load (i.e.
save and re-open) the log file after changing these values in order for
the status to be correct.
Enter values from QRZ offers the ability to fill in values from QRZ after either a fully automatic look-up or a manual look-up. Select the fields to be included. Enter your QRZ login credentials in the Profile.Note that the full QRZ lookup requires you to pay a yearly fee.
The QRZ Logbook API Key is available on the QRZ Logbook 'Settings'
page. Note that if you enable automatic logging, you can halt automatic
logging for a new entry by inserting '-A' in the Remarks field. The -A
will be removed by jLog before storing the entry. A master Auto on/off
checkbox on yhe bottom of the Main window will also override the auto
logging
HRDlog Key and Club Log e-mail and Application Password fields with corresponding Auto and Pop-up checkboxes are also available and correpsonds to the QRZ fields.
DX Clusters ("Spots") tab
Setup Telnet DX Spots (or indirect access via DXC or similar). Choose a predefined Host or specify Address and Port directly. The predefined hosts are defined in the file 'conf/cluster.dat' in the jLog installation folder. You can freely edit this file. The syntax is one host per line specifying <name>,<IP Address>,<Port>.
eQSL tab
Allows automatic or manual logging at eQSL. Successful submissions are logged to the file 'save/eqsl-log.txt'.
Specify the User name and Password to be used. You can make use of
multiple IDs at eQSL, e.g. reflecting different Callsigns. eQSL ID can
also be linked with a specific Configuration (see 'Config tab above)'.
This will override the choice of Active ID in the Profile.
Enable real time logging with the Submit new entries automatically checkbox. When unchecked, entries must be manually submitted using the Entry->Submit command (and the same User name and Password).
Allow manual submission must be checked to allow manual submission using the Entry->Submit (eQSL) command (or corresponding pop-up menu command).
Auto-convert QSL-status for entries marked 'eQSL' in 'QSL Sent Via' field is only applicable when converting a log database file from V 3.x to V4. It allows you to automatically set the new eQSL S/R-fields using the previous combined S/R-fields and the value 'eQSL' in the 'QSL Sent Via' field. Verify manually and clear these "Assume…" fields when they are no longer needed.
LoTW tab
Allows automatic or manual logging at LoTW.
Specify the User name and Password to be used. You can make use of multiple IDs at LoTW, e.g. reflecting different Callsigns. LoTW ID can also be linked with a specific Configuration (see 'Config tab above)'. This will override the choice of Active ID in the Profile.
Enable real time logging with the Submit new entries automatically checkbox. When unchecked, entries must be manually submitted using the Entry->Submit command (and the same User name and Password). Note! You can avoid automatic submission for a new entry by inserting '-A' in the Remarks field (also possible in WSJT-X). The '-A' will be removed by jLog.
Allow manual submission must be checked to allow manual submission using the Entry->Submit (eQSL) command (or corresponding pop-up menu command).
Path to TQSL Program must be setup properly.
TQSL Locations (comma separated list) must correspond to
the Locations specified in the TQSL Program!
WSJT-X User Activity check will only consider LoTW Users active if they have submitted entries during a certain period. Specify this period here, e.g. during the "last three months" or "last year".
UserDef tab
This allows you to store any info related to a contact in up to ten columns. You can define the column name and values for every row. Examples can be columns like "Wife-name" or "Pet-name", "Car- brand", etc, You are allowed to have two different sets of names. Use File->Properties to allocate a set to a specific log file. Use the Entry window ('Udef' tab) to fill in values for contacts just like you do with any other info. ADIF export will include these fields in a standardized format.
Entry tab
Specify how to handle an empty End-time field when closing the Entry form (dialogue).
You can force the Entry form to stay on-top; i.e. not be hidden by any other windows. There is a checkbox at the bottom of the Entry form that allow you to temporarily disable this functionality.
You can control the frequency of checking for updates. If you have a permanent connection to the Internet, frequent checking is recommended to be quickly warned in case a critical update is released; i.e. at least weekly. You can issue the "Help->Check for Updates" command any time regardless of this setting.
You can setup the mode for each of the four mode quick select buttons in the Entry window.
You can also setup a conversion of 'PKT' mode from the radio to any of the preselected modes, e.g. FT8.
Visual tab
Allow theme switching, change Look and Feel settings such as default Light and Dark themes and whether or not to follow the system theme switching.
Linux users are given the possibility to double the size of the jLog application when using a HiDPI monitor (often referred to as 4k or 5k monitors. MacOS and Windows will do this automatically and should not need this functionality.
The command View→'Auto resize view' will automatically adjust the size of every column so that the heading and the column content fits. You can limit the maximum width of any column by specifying it here.
Change the size of all fonts in jLog relative to their default size by adjusting the slider.
Alternatively, replace and/or resize individual groups of fonts.
Relocating the Profile
The Profile (consisting of the files 'profile.1' and 'profile.xml') can be placed outside their normal location in jLog’s '$HOME/jLog/save' folder. Create the file '$HOME/jLog/save/profile.txt' and insert a single line with the new location path, e.g. '/Users/john/Public/'.
This can be useful for Dual-boot setups, etc.
3.8. Help
3.8.1. On jLog
Displays the on-line jLog User’s Guide in a browser.
3.8.2. Register
The non-registered version of jLog allows a maximum of 200 entries, mainly for evaluation purposes. Register jLog (using Help->Register) and open up more capacity free of charge. See top menu item Register.
3.8.3. System Info
Displays various System information related to the Java environment. Use Save As to save it to a file e.g. for sending it to mail@jlog.org when requesting support.
3.8.4. Check for Updates
On-line check for new versions. Make sure that you are connected to the Internet when using this command. The http-protocol is used in read-only mode so nothing is sent from your computer.
3.8.5. About (for macOS: jLog->About)
Displays the jLog and Java Versions and the address of the jLog Home Page (https://jlog.org/) and E-mail address ( mail@jlog.org) to be used for Support.
4. How to
4.1. Navigate between and inside windows
The following keys are used for efficient navigation between the windows without using the mouse.
'Alt' + 'm' or |
Switch focus to the Main Log window |
'Alt' + 'l' or |
Switch focus to the Log Entry window (if open) |
'Alt' + 'k' or |
Switch to the Keyer if open or otherwise the mini-keyer. If neither is open, a new entry is opened and the mini-keyer is started. |
The following keyboard commands are available when a log entry has been selected in the Main Log or Previous Log windows:
' ' |
Open current entry |
'e' or 'E' |
Edit current entry |
'z' or 'Z' |
Switch between Main and Previous lists |
'p' or 'P' |
Switch to Previous list (only available in Main Log) |
'm' or 'M' |
Switch to Main list (only available in Previous Log) |
4.2. Work with Configurations
jLog is designed to take advantage of collecting all contacts in a single file, even if these are linked to different QTHs, IOTAs, equipment, operators, etc. Configurations reflecting e.g. different QTHs, may also be linked to different TQSL 'Locations' and 'eQSL 'Nicknames'.
Configurations are defined in the Profile and used by mapping each row in the log (Main window) to the correct configuration reflecting QTH, TQSL Nickname, etc.
4.2.1. Setup in the Profile
Configurations are defined in the Profile, Config tab where one or more configurations are listed in the table at the top. The table shows a subset of the values to help differentiate between the entries. When you select an entry in this table, the full set of values is shown below. Give each entry a characteristic name and a very short 'Abbreviated Config. name' to be used in the main log window. If you make changes to the values for a selected configuration, click 'Update' to save it before switching to another configuration. Changes to the selected configuration is saved when closing the Profile.
Please observe that the TQSL Locations and eQSL Nicknames are defined under the LoTW and eQSL tabs respectively. TQSL Locations must reflect the configurations defined in the TQSL application. eQSL Nicknames must reflect the values defined at eqsl.cc.
4.2.2. Use
When a new entry is created, the currently selected configuration in the Profile is selected so it will not require any additional action.
In case you need to change the configuration for one or more entries in the Main window, simply select them and use Entry->Set Configuration to change to another value.
ADIF Import will automatically generate new configuration entries if the currently available entries does not match. You may need to rename, delete or rearrange entries both in the Profile and in the main log window after a new ADIF import.
4.3. Tailor the View
The main window view can be tailored by rearranging the sequence of columns, resizing column widths, hiding and un-hiding columns or replacing columns.
4.3.1. Concept
It it useful to understand how Views relate to columns, and flexible columns in particular and further, to QSO fields (ADIF fields). The may help such understanding.
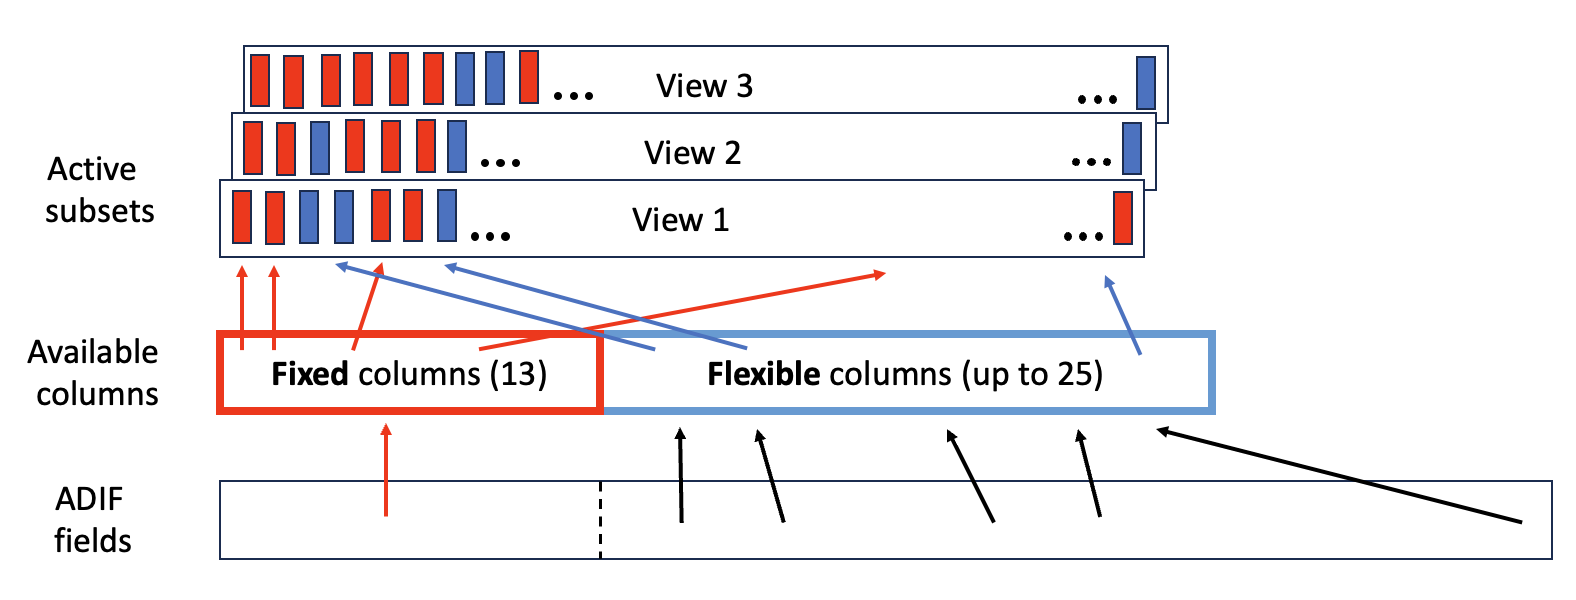
The 13 fixed columns (e.g. Date, Time, station, etc.) were defined in jLog early days. The flexible columns (was 10, now 25) can be used to display any other field of interest.
4.3.2. Rearrange columns
Move a given column to the left or to the right by clicking og holding down the mouse on a column header and then moving it to either side. Avoid moving any column ahead of, or between Date and Time. Repeat for other columns if necessary. End by using View->Save view->n to save the view.
4.3.3. Resize columns widths
Place the cursor between the column you want to remove and the next column, making sure that the special cursor appears. Then, click and hold the mouse down while moving to the left or right. Release when the column size is as preferred. Repeat for other columns if necessary. End by using View->Save view->n to save the view.
4.3.4. Hide/un-hide columns
Right-click on any column header in the Main Window to make a popup header appear. Click on the column name to hide/un-hide a specific column name.
You can also open View->Columns and select the column name in the Active Columns table to the right and push the Rem(ove) button. Copy a column name from the available view to the Active view to un-hide a column. Repeat if necessary and the close the Columns setup window using the OK button.
End by using View->Save view->n to save the view.
4.3.5. Add columns
jLog has a basic set of 13 columns that cannot be replaced; only moved or hidden. The initial 13 columns are followed by 25 flexible (replaceable) columns. Each of the replaceable columns can be swapped with 33 other columns (e.g. IOTA#, CQ Zone, Contest ID, etc.).
To add a column (i.e. replace one of the 25 flexible columns), open View->Columns. The table to the left contains the 13 basic columns followed by the currently chosen, up to 25 flexible columns. Edit the replaceable columns using the "Setup flexible columns" button, then exit using the OK button. The content of the Available columns to the left will reflect the changes, as will the table to the right where replaced columns will be automatically removed. Add a column to the Active columns table by selecting the name in the Available Columns table and then clicking the '+>' button in the middle. Repeat if necessary and the close the Columns setup window using the OK button.
4.3.6. Switch Look and Feel (LAF)
Java offers a few built-in LAFs and jLog adds three dark and one light additional LAFs based on FlatLaf. Use File->LAF to change LAF.
jLog makes it possible to track the Light/Dark theme setting of the system at least for newer MacOS, Windows 10+ and Ubuntu Linux. LAF settings are available in the Profile’s Visual tab. Choose the default Light and Dark themes to switch between. Switching occurs with the system (if enabled) or using the Theme switching button in the Toolbar.
4.4. Tailor menus
Some of the Drop-down or pop-up menus may contain a large number of entries that would complicate every day use (e.g. frequencies or modes). The View menu provides commands to select the entries that reflect your needs. Only the selected entries will appear e.g. the corresponding entries in the Entry window.
4.4.1. Modes
Use View->Modes to select your preferred modes. Not that the ADIF hierarchy is shown, differentiating between modes and submodes. As an example: FT8 is a mode, but FT4 is a submode under the MFSK mode.
Modes with submodes shows a '>' symbol to the left of the mode name. Click on the '>' symbol to show the submodes. Use the checkboxes to select preferred modes.
jLog mode menus (e.g. the Entry window) provides a list of a these selected names, without differentiating between modes and submodes. In case of ADIF export, the hierarchy is restored automatically.
4.4.2. Frequencies
Allows you to select the Frequencies (or more precisely, Frequency Bands) that are actually used (to make the drop-down menus shorter and more user friendly).
4.4.3. Contest IDs
Allows you to select the Contest_IDs that are actually used (to make the drop-down menus shorter and more user friendly).
Names are as defined by ADIF, i.e. an abbreviated name used in menus and the official full name. Some of the contests have two additional parameters:
-
Abb. is an abbreviated name used in menus
-
Contest-IDs is the official name
-
CabLen defines the Cabrillo export log format length (79 or 81 is most commonly used)
-
ExFmt defines the Cabrillo Exchange format type
Please report missing CabLen values or ExFmt types to mail@jlog.org for inclusion in the table.
4.5. Sync radios
A somewhat experimental function in Tools->Radios allows you to enter a Sync Delay that will enable Radio 2 -> 1 synchronization. Any non-zero value will enable synchronization, but recommended values are e.g. 200 - 500+ ms.
A typical use of this is to allow an SDR receiver connected as Radio 2 control the frequency of a traditional transceiver connected as Radio 1. This combination "converts" a traditional transceiver into an SDR transceiver when it comes to getting a good overview of the frequency band.
4.6. Add non-standard fields and columns ('UserDef' fields).
UserDef fields allows you to store up to eight non-standard values related to a QSO. You can define a name of each field. Examples to give you an idea can be fields like "Wife-name", "Pet-name" or "Car-brand", etc. e.g. related to your special interests. These fields will be exported with the standard fields in an ADIF export, along with your field names.
jLog allows you to have two different sets of field names (to be setup in the Profile UserDef tab). Use File->Properties to allocate such a set to a specific log file. Use the Entry window ('Udef' tab) to fill in values for QSOs just like you do with any other info.
Note that jLog V6.8 allocates the UserDef7 and UserDef8 fields to store contest Exchange 2 sent and received fields. jLog V6.9 uses UserDef6 to store Region. This limitation is an interim solution and will be changed with jLog V7 that will use an extended file format.
4.7. Use the Queue
Many jLog commands allows you to handle multiple entries using multi-selection in the main window. A slightly more semi-permanent selection can be obtained by using the Queue to select entries. The Queued entries will be saved with File->Save and restored when opening the file again.
You can use the Queue ("Q") to indicate entries for further inspection or manual modification. ADIF Export can also act upon Queued entries only. Cabrillo export may also use the Queue in a future version.
4.8. Relocate the Home folder
The jLog Home folder is typically placed in a user’s $HOME folder. You may want to relocate the jLog folder to share it across computers and in particular to share it using e.g. Apple iCloud or other cloud storages.
The Profile (consisting of in particular, the files 'profile.1' and 'profile.xml') can be placed outside their normal location in jLog’s '$HOME/jLog/save' folder. Create the file '$HOME/jLog/save/profile.txt' and insert a single line with the new location path, e.g., '/Users/john/Public/'.
4.9. Use jLog for Contests
jLog has had a minimal ("experimental") contest support for more than a decade. jLog V6.8 extends the contest support, although still being somewhat experimental and mainly targeting the not-so-very-active contest contenders. You can log contest entries directly in jLog and export the result using the new Cabrillo Export V3.
4.9.1. Setup
View->Contest IDs lets you select your favourite subset of all Contest IDs. Unless you have not yet used View->Contest IDs, please run it now to select your favorite contests.
Then, open Contest->Setup before starting contest logging and select the desired ContestID. The parameters Cabrillo Length and Exchange Type will be automatically filled in for the most popular contests. If not filled in, study the contest information and set these entries yourself. The Exchange Type indicates whether one or two extra exchanges are used in this contest (in addition to RS(T) or dB). It also indicates whether or not exchange 1 is numeric and should be auto-incremented after each QSO.
If either of the Exchange fields are supposed to carry a fixed value, this is the place to fill in these values. jLog will automatically copy these values to the Entry window before a new QSO as long as Contest->On is enabled.
If you cannot find the desired contest in the list of all Contest Ids, run Contest->Setup and fill in manually the contest name, Cabrillo length and Exchange type. Use the Setup button (to the right of the Cabrillo length field) to specify Cabrillo log format details. If fields are empty, use the Init button to initialize all fields with typical values for the specified Cabrillo length. Note that your contest may need slight adjustments to comply with the required format of this contest.
4.9.2. Operating
After completing Contest->Setup, use Contest->On to enable the contest exchange fields in the Entry window. Note that these fields are enabled according to the Exchange Type field in Contest->Setup and will have any fixed values set in Contest->Setup, automatically filled in.
It should normally be favorable to push the Tab key to navigate between fields.
Each contest QSO should be ended using the "Apply" button in the Entry window. This will prepare for the next QSO by storing the record, clearing fields and if necessary, auto-incrementing sequence numbers and filling in any fixed values for the exchange fields.
4.9.3. Calculate Score
This is perhaps the most experimental part of contest support so far. Only a few contests are specifically handled, filling in multipliers, points and calculating the final score. These are the SAC, ARRL DX and CQ-WPX, all using Exchange 1 Auto-numbering mode. Other contests are supposed to use the Contest->Manual position indicating no attempt to calculate the final score.
4.9.4. Cabrillo Export
After finishing logging, use Cabrillo Export to export all or selected entries to a file for submission to the contest organizer. This implies setting up the Cabrillo V3 header. You should inspect the Contest Rules to determine which header entries that need to be filled in.
4.9.5. Import from contest loggers
If you are a serious contester using a dedicated contest logger (e.g. N1MM), you should use File->Import->ADIF to transfer the QSOs. If ContestID is not transferred from the logger, select the QSOs in the main window and use Entry->Set ContestID to set it.
4.10. Track QSLs
jLog allow for independent tracking of QSLs Sent/Received via
-
Bureau/Direct (traditional)
-
eQSL
-
LoTW
Each of them provide separate columns with checkboxes for sent and received. If you need to edit QSL Status manually, make sure that 'Edit S/R' is enabled (i.e. Entry->Edit S/R toggles this flag).
4.10.1. Classic (Paper) QSLs
QSL Status (S/R) is shown as a checkbox in the main Window. The values can be updated directly by clicking inside the checkbox provided that you have enabled this function. The value Entry->'Edit S/R' enables/disables this function (also available in the right-click pop-up menu). QSL status can also be updated in the Entry form.
Sending QSLs
If you use an external program to print QSLs or QSL labels, you may want to use ADIF Export to transfer all entries, or selected entries only. Use either multiple row selection or the Queue column. Multiple rows are selected by means of the Shift and/or Ctrl keys (slightly platform dependant). The Queue column behaves just like the QSL S/R columns. The ADIF Export pop-up contains checkboxes to allow only the selected or the queued entries to be exported.
Receiving QSLs
Use of the simple Search field in the Main Window is recommended to easily find the entry when updating the log after having received a QSL card.
4.10.2. Logbook of The World (LoTW)
jLog provides automatic and manual functions for interaction with ARRL’s Logbook of The World (LoTW).
Profile
The LoTW User name and password must be entered into the Profile before this service can be used. The LoTW User name and password must be entered into the Profile before this service can be used. You can also choose whether or not to automatically send new log entries or also block manual sending of entries. In the latter case, ADIF Export must be used to transfer entries. The automatic functions obviously requires a permanent connection to the Internet.
jLog makes use of ARRL’s TQSL program to sign entries before submission. The path to the TQSL program must therefore be set in the Profile. TQSL makes use of the term location when signing. Make sure that the location values are known in jLog. These values are presented as choices when establishing 'config' values in the Profile; i.e. a given config typically maps to a TQSL location.
Sending QSLs
QSLs are sent to LoTW in several ways
-
by bulk transfer using ADIF Export of all or part of the log
-
using multiple row selection or the Queue column to select entries to be sent directly from jLog
-
automatically when new entries are created (requires a permanent Internet connection and access to the TQSL program)
Receiving QSLs
Use the Tools->LoTW Sync command to update the eQSL Received status column.
Updating QSL status
To update the LoTW S/R status columns for previously sent entries, use the Tools->LoTW Sync command. Make sure that the log file corresponds to the LoTW log! Note that this may take a while to complete if the number of QSOs is large. Also note that this will not create new entries at either side. Please observe any irregularities by inspecting the log file 'import.txt'.
4.10.3. eQSL
jLog provides automatic and manual functions for interaction with eQSL.
Profile
The eQSL User name and password must be entered into the Profile before this service can be used. You can also choose whether or not to automatically send new log entries (using the eQSL "Real-time interface") or also block manual sending of entries. In the latter case, ADIF Export must be used to transfer entries. The automatic functions obviously requires a permanent connection to the Internet.
Sending QSLs
QSLs are sent to eQSL in several ways
-
by bulk transfer using ADIF Export of all or part of the log
-
using multiple row selection or the Queue column to select entries to be sent directly from jLog
-
automatically when new entries are created (requires a permanent Internet connection)
Receiving QSLs
Use the Tools->eQSL Sync (Inbox) command to update the eQSL Received status column.
Updating QSL status
To update the eQSL Received status column, use the Tools-> eQSL Sync (Inbox) command. Make sure that the log file corresponds to the eQSL log! Note that this may take a while to complete if the number of QSOs is large. Also note that this will not create new entries at either side. Please observe any irregularities by inspecting the log file 'import.txt'.
To update the eQSL Sent status column, use the Tools->eQSL Import (Outbox) command. Prior to this, visit the eQSL Outbox tab and click on the 'Download Log in ADIF format ' link, save to a local file (to be imported in jLog).
4.11. Interface jLog
4.11.1. Use Keyer(s)
The built-in keyer can be used when a radio set is connected to the computer. Two Keyer interfaces are available; the standard Keyer and a mini-Keyer (visible only when adding new entries). Switch to a keyer from Log input using ALT+'k' and back again using ALT+'l'.
Send user defined text using Function Keys F5 to F12 or type in text using the keyboard. All characters represented by the Morse code can be transmitted. In addition, unused characters are used to represent special sequences as follows:
+ |
KN |
& |
AR |
% |
AS |
< |
KA |
> |
SK |
_ |
EEEEEEEE |
The following keys are used to indicate that specific values should be inserted:
| * | Your own callsign is inserted (as defined in the Profile) |
|---|---|
@ |
The other station’s callsign (from an open new entry only) is inserted |
$ |
The 'Sent RS(T)' (from an open new entry only) is inserted |
# |
The 'Send Serial Number' (from an open new entry in contest mode only) is inserted |
These characters can be used both in F5 - F12 character strings and typed in from the keyboard.
Keys F2 - F4 are used as follows (may change in the future):
F2 |
FLUSH transmission buffer (i.e. cancel all transmission) |
F3 |
Increase Speed (same as PageUp) |
F4 |
Decrease Speed (same as Page Down) |
The Keyer uses the Radio interface port selected in the Profile. The RTS pin (7) is used for keyer output. Ground is pin 5.
4.11.2. Interfacing radios
jLog offers several ways to interface up to three radios:
-
Serial COM port, typically a USB based 9-pin connector
-
TCP connection to the radio
-
TCP connection via Flrig to the radio
-
TCP connection via Hamlib rigctl to the radio
See Radios regarding the TCP based alternatives.
The Radio interfaces allow for automatic logging of frequency and mode. When a radio is properly connected, the current frequency and mode is displayed in the lower right corner. Turn on Auto refresh or Auto updates in the Radios setup to allow for continuous updates of both frequency and mode. Note that older radios may not be suited for Auto updates but any radio can use Auo Rfresh. ICOM radios will always update automatically, provided that the "Transceive" mode is on.
If you do not need the radio interface, turn off 'Radio present' in the Radio tab in the Profile.
Setting up serial CAT communication
Please visit the jLog Web site (installer page) for updated, platform specific instructions.
Physical connection
Please refer to the equipment manual. The following guidelines are valid for e.g. my old Icom IC-765:
Using a standard 9-pin D-type female connector for the PC, the Radio need only be connected to pin 2 (TX), 3 (RX) and 5 (GND).
However, pins 1 (DCD), 4 (DTR), 6 and 9 must be interconnected at the computer end. Pins 7 (RTS) and 8 (CTS) must be interconnected if a Keyer is not used. If a Keyer is used, pin 8 must be connected to pin 4 (with 1, 6 and 9) and pin 7 used as output to the Keyer as shown below:

Goto e.g. http://www.qsl.net/g3vgr/civ.html for a suitable ICOM - PC signal converter. Similar solutions may be needed for older Kenwood and Yaesu models.
Radio parameters
The radio parameters can be configured using the Tools->Profile menu. Please report back positive and negative experiences.
Set values using recommendations in the computer and radio manuals.
To interface a Keyer without using the Radio (CAT) interface:
-
Set Radio present
-
Select the "Serial" Port type
-
Select the appropriate Port
-
Set baudrate to any non-zero value; e.g. 1200
-
Trace Off
-
Manufacturer = Other
-
Do not set Model ("blank")
-
Auto refresh Off (Rate > 0%; e.g. 10%)
Setting up a TCP/IP CAT connection
jLog can interface modern radios using TCP/IP in stead of a serial port, e.g. for the Flex 6000 series.
-
Set Radio present
-
Select the TCP/IP Port type
-
Select the IP Address and Port (use 'localhost' if running on the same computer)
-
Trace Off
-
Set Manufacturer and Model (e.g."Other"and "SmartSDR" for the Flex 6000-series)
-
Auto refresh Rate > 0%; e.g. 5%
4.12. WSJT-X Tracker
The WSJT-X Tracker (or just Tracker for short) is a built-in tool that
links jLog and WSJT-X to provide extended capabilities. It assists the
user in keeping track of confirmed Countries, Prefixes, US States and US
Counties by both colour coding callsigns in WSJT-X entries and by it own
list of potential stations of interest. The logic is similar to the
colour coding of entries in WSJT-X.
WSJT-X indicates e.g. whether or not a specific country has been worked or not. The WSJT-X Tracker on the other hand, indicates whether or not a specific country has been confirmed or not. Confirmation status can be related to both eQSL and LoTW. It will also take into account whether or not the station of interest is listed as an Authenticity Guaranteed (AG) eQSL user or as a confirmed user of LoTW.
The Tracker will both show selected stations in the Tracker Main windows and as coloured entries in WSJT-X as shown here:
![]()
Tracker main window example

Example of Tracker colouring in WSJT-X’s list
JTAlert (Windows only) and Gridtracker are examples of applications
providing similar kind of services as the WSJT-X Tracker
4.12.1. Getting started with the Tracker
The Tracker communicates with WSJT-X using the UDP Logging Port. The port is setup on the Profile->Radio page (typically using localhost or 127.0.0.1 as address and port 2237).
The are more than one way to connect WSJT-X and jLog to the radio when
also using both of them:
-
1) Separate CAT ports from the radio to jLog and WSJT-X (e.g. over TCP/IP) is recommended when available
-
2) Some kind of serial port splitter or virtual serial ports with splitter functionality (e.g. VSPE and Elitima for Windows)
-
3) jLog connected to the radio COM port and jLog used as a 'CAT server' for WSJT-X. Note that Auto updates mode is currently required as Auto refresh mode may cause WSJT-X to repeatedly loose connection to jLog. Note that CAT Server seems to fail under Linux due to an error in Hamlib.
-
4) While using WSJT-X, jLog has no active serial port. Only recommended if you do not use other modes than handled by WSJT-X because jLog will be made unable to provide frequency and mode to the Entry window when logging new QSOs.
Make sure that the corresponding UDP Server setup in WSJT-X (Reporting tab in Settings) is as follows:

UDP Server setup in WSJT-X Setup, Reporting tab
Use can use localhost, 127.0.0.1 or 224.0.0.1 as the address. The latter is a multicast address.
Start the Tracker using Tools->WSJT-X Activity Tracker or simply Cmd-T
(Mac) or Alt-T (Windows/Linux). You can start it automatically by
checking "Open at start-up" in the Profile->Misc tab under WSJT-X
Tracker.
4.12.2. The Tracker Main window
![]()
The main window of WSJT-X Tracker
The columns are as follows:
Column header |
Description |
Station |
Callsign |
Modif |
CQ modifier/extension (e.g. DX, EU, AS, US, JP, etc.) or RR73 |
Sig |
WSJT-X 'Sig', i.e. signal strength |
aWkd |
Already worked country (marked as 'w') |
eC |
eqsl Confirmed country |
lC |
lotw Confirmed country |
eU |
eqsl User AG (i.e. on the Authenticity Guarantied users list) |
lU |
lotw User (i.e. on the list of users that has submitted to LoTW) |
Grid |
+ |
Country |
+ |
Comments |
+ |
The Tracker Main window provides right mouse button popup menu for
various lookup services.
4.12.3. Tracker setup
The 'Setup' button in the Tracker Main window will open the Tracker Setup window.
![]() WSJT-X Tracker Setup window
WSJT-X Tracker Setup window
Only stations with a stronger signal than 'Minimum signal strength' will be acted upon both in the WSJT-X Tracker main window and with respect to coloring stations in WSJT-X list.
'Show countries not confirmed by both eQSL and LoTW' will list non-confirmed countries as long as they are not confirmed by both eQSL and LoTW. (There is an intention to differentiate this similar to the following entries).
You can differentiate between eQSL and LoTW for non-confirmed prefixes, US States and US Counties. Note that color coding will give priority to prefixes over states and states over counties.
The next two rows are assumed to be self-explanatory and less frequently used. Note that 'Stations worked before' are always colored in WSJT-X lists. This option is related to the Tracker main window only.
The Tracker will perform lookups for CQ calls only as default. You can enable lookups for RR73 messages and 73 messages also. Be aware that more frequent checks requires more processing power and also a faster Internet connection.
You can ignore specific countries. Enter the DXCC numbers separated by comma (no space). Or, simply push the Set button and select from the menu.
You can specify Wanted Grids as comma separated list of 2 or 4 character grids(no blanks in the list).
You can specify Wanted Stations as comma separated list of callsigns (no blanks in the list).
The Refresh button will refresh the eQSL and LoTW user lists. This is particularly important for LoTW since the list contains a last active date.
4.12.4. Color coding of callsigns in WSJT-X
Another example of WSJT-X callsign colouring (old colour scheme):

In the example above, YH2 and YH5 are prefixes that has not been confirmed. BH6LIG and BD4STG has already been worked.
The following colour scheme (changed in jLog V6.12) is used to colour callsigns in WSJT-X.
![]()
Note that "New" is this context is short for "Not yet confirmed"
The colors (foreground and background combinations) can be changed with the Tools->'WSJT-X colours setup' command.
4.13. Interconnection of N1MM and jLog
N1MM is a popular contest logger running under Windows. The N1MM UDP Broadcast protocol will allow jLog and N1MM to connect independently of which platform jLog runs on (e.g. MacOS or Linux). Two modes are available:
-
Continuous import of QSOs from N1MM in real time during a contest
-
Re-broadcasts of any previous contest
The UDP broadcasts may be used as an alternative to ADIF export. The ADIF export from N1MM may need some editing before importing it in jLog. When using the UDP broadcasts, jLog offers a command to set up automatic mapping or switching between tags.
4.13.1. Setting up UDP Broadcast in N1MM’s Configurer
Open Config->Configure Ports, Mode control, Winkey, etc… in N1MM.

In the Broadcast Data tab: Enable the Contacts checkbox and fill in the IP address and port of the computer running jLog. For the local machine (localhost), use 127.0.0.1:12060. On a separate machine, use the machine’s specific address. Note that a colon is used to separate address and port. Port 12060 is recommended by N1MM. Use e.g. 12061 if 12060 is occupied by another service.
4.13.2. Setting up the N1MM Import in jLog
Address and port
Open Contest->N1MM Setup… in jLog and fill in the N1MM address and port.

If N1MM is running on the same computer or addresses the computer running jLog specifically, 127.0.0.1 will suffice. Fill in the port used when setting up N1MM, normally 12060.
N1MM to jLog mapping
Setup the mapping between N1MM’s tags (left) and jLog’s tags (right). Note that the S/R <i>Exch</i> 1/2 fields appear in jLog’s Entry (QSO) window following the RST fields. Each of the drop-down fields contain the candidate N1MM fields to source the jLog fields. A typical default setup is shown.
The use of fields by N1MM may vary from contest to contest. Please report back if more field has to be added to the drop-down lists.
Optional date or date interval
When you use the N1MM Tools->Rebroadcast all Contest QSOs to other Apps… command, N1MM broadcasts all entries in the current database. In case this contains more than one contest, you can use jLog’s Date(s) field to limit the import to the desired contest.
Trace output to a file
When experimenting with the setup, it may be useful to see the actual data sent by N1MM. Check the Trace checkbox to direct the data to a file. Note that writing to the file puts an extra load on the computer while N1MM continues to broadcast data at a fixed rate (with no "hand-shake protocol" to avoid loosing data).
5. Register jLog
The non-registered version of jLog allows a maximum of 200 entries, mainly for evaluation purposes. Register jLog (using Help->Register) and open up more capacity free of charge. The penalty of specifying too high capacity is the corresponding memory requirement. So unless you have a powerful computer with lots of RAM, you should start with a reasonable value and re-register later if you need to increase the capacity. Remember that when more than one log file is used, the capacity must match the size of the largest file. Note that older registration codes received by e-mail, are not valid.
Note that Callsign and Name will appear on the Main screen (top right). These values cannot be changed later and will be used when e.g. creating Contest Log Headers in the Cabrillo format.
6. FAQ
-
Q: I get lots of 'Check Config' warnings when I run Verify
-
A: Please fill in at least one entry in the Profile under the 'Config' tab, including a Config Abb. Go to the Main window and mark all (Ctrl-A) or a subset of the entries, right-click and choose 'Set Configuration'. Choose the relevant abbreviated Configuration name.
-
Q: I have configured additional columns but they do not show
-
A: Please use the View→View All command to make them visible. Rearrange columns and then save using View→Save View→n
-
Q: The date format is not as expected
-
A: Please use the View→'View All' command, rearrange columns and then save using View→'Save View'→n
-
Q: My favourite modes are not found
-
A: Please use View→Modes to make more modes or submodes visible in the menus+
-
Q: I cannot find the UHF bands or other bands that I need
-
A: Please use View→Frequencies to make more frequency bands visible in the menus
© Copyright 2001-2025 LA3HM. All Rights Reserved. X: https://x.com/jlogorg
Last update: 2025-11-23